
Published 2026-10-09 · DIYCarPlay Engineering Team
Antenna Placement Inside the Dash: What Decides Whether a Wireless CarPlay Link Holds
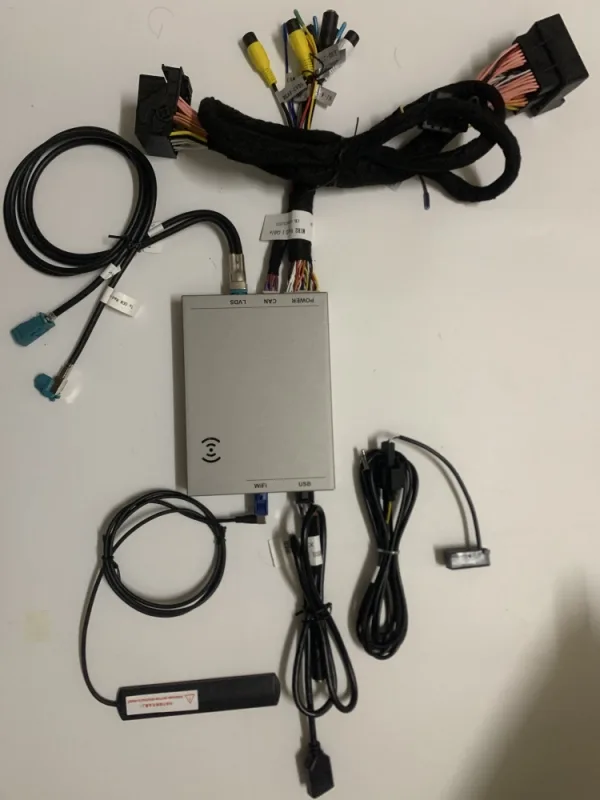
A carplay retrofit module is fitted to a head unit that never had CarPlay in the first place. The module sits behind the factory screen, joins the vehicle data bus and the LVDS display cable, and turns the original panel into a wireless CarPlay display. The screen itself, the factory host, the original buttons and the reversing camera are never removed.
Because that wireless link is carried by two small antennas mounted inside the dashboard, their position decides reliability far more often than a specification sheet does. Three things break a link that has already connected: metal in contact with an antenna body, the head unit's own shielding wrapped around the module, and a crowded 2.4GHz band in a multi-storey car park. Each is an installation problem rather than a product problem.
What a CarPlay retrofit module does inside the head unit
Four jobs sit on the module. It completes the handshake with the head unit over the vehicle bus. It negotiates LVDS timing with the display so the panel keeps its native resolution instead of dropping to a fallback. It terminates the CarPlay stream arriving from the phone. And it runs the dual-band radio that carries that stream.
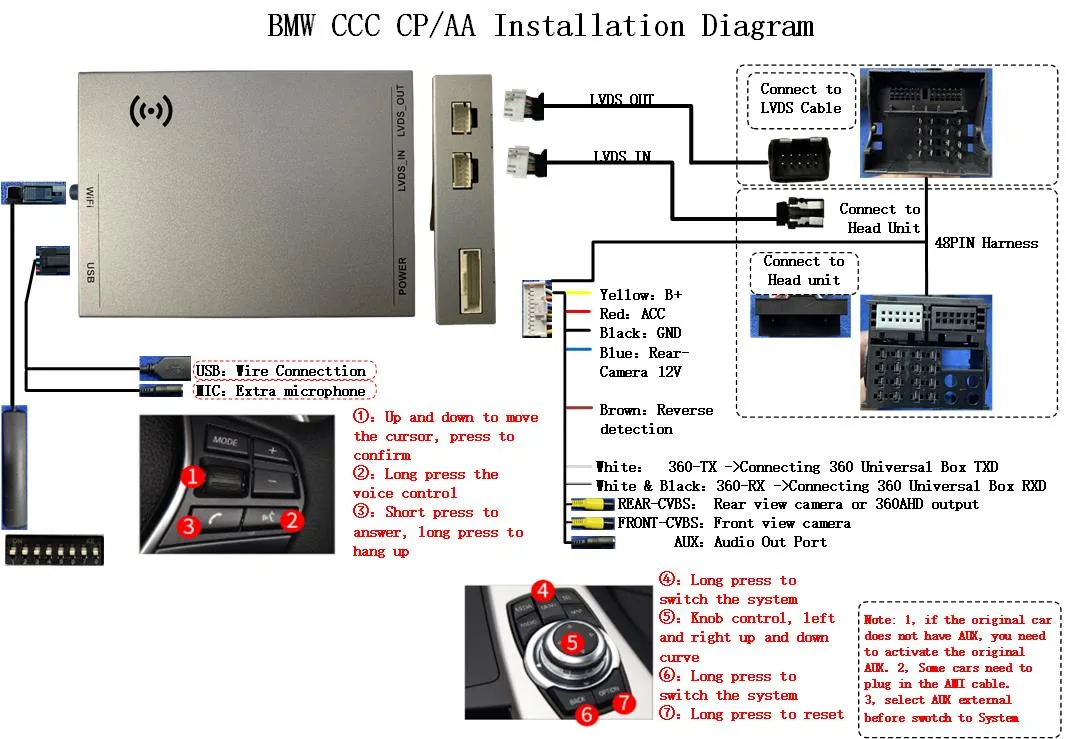
The wire side is small and legible. Constant battery, switched ignition, CAN-H, CAN-L, the reverse trigger, and LVDS in and LVDS out. Nothing is cut, no wire is tapped, and the factory connector on the display side is unplugged and re-plugged through the harness rather than spliced. Apple documents the same CarPlay feature set and the same requirement for a working wired or wireless connection on its CarPlay support page, so what changes in a retrofit is only the delivery path, never the feature list.
Which cars are eligible at all is decided before any of this is discussed. The vehicle fitment finder walks the head unit generation rather than the model year, because a 2018 car in one market and a 2018 car in another can carry different display hardware.
Why antenna placement decides whether the link holds
The 5GHz band has considerably more contiguous free spectrum than 2.4GHz, and it is where consumer WiFi and Bluetooth mesh congestion is thinnest. That is the reason dual-band modules favour 5GHz for the actual video stream rather than sending everything on 2.4GHz. The trade-off is physical: 5GHz is absorbed far more readily by metal and wet concrete than the lower band, so a 5GHz link that works at the roadside can fail two floors underground.
That failure does not look like a fault. The phone pairs, the icon appears, video starts, and then a stall arrives when the radio negotiates down through obstruction. The remedy is placement, not replacement:
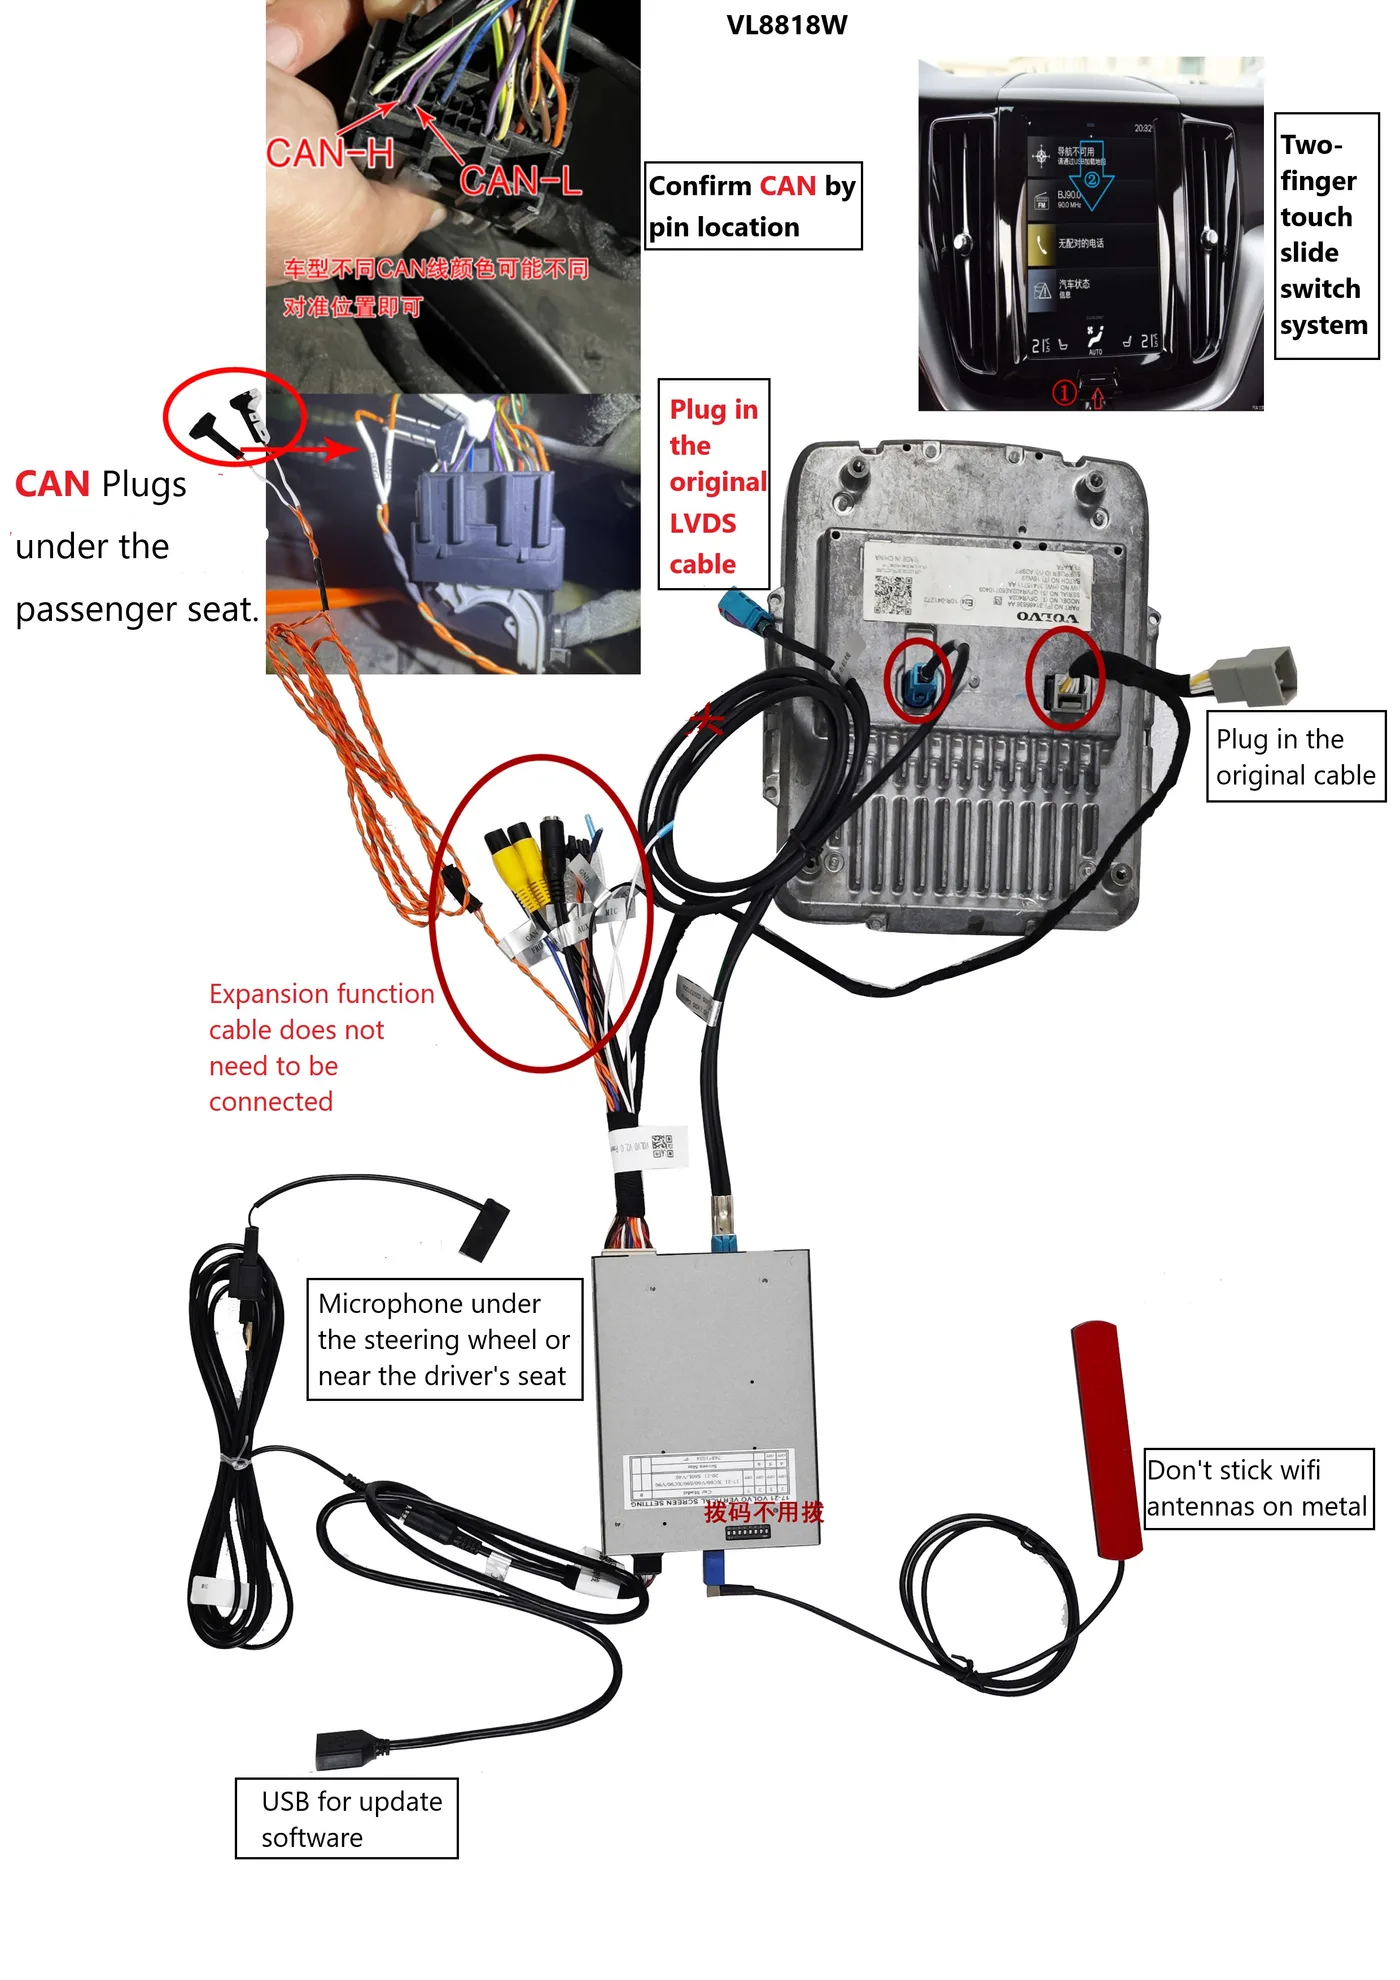
- Do not let the antenna body sit against metal. Adhesive-backed pads should fix the antennas to a plastic surface, or the pigtails should run forward into open cabin volume.
- Keep the antennas out of the head unit cavity. A module boxed in behind the display sits directly against the head unit's shielding, which behaves like a conductive shroud around the antenna.
- Do not fold the pigtail back on itself. A doubled-over length is a lossy stub; route the cable forward or toward the A-pillar area.
- Leave the two antennas apart from each other. Fixing both to one spot makes the pair behave less like two independent radios.
The band choice matters in a specific way underground. A parking structure with a hundred ceiling access points will fill 2.4GHz almost entirely — the 2.4GHz band is the most crowded of the three WiFi bands precisely because it is the oldest and the most widely deployed, as the Wi-Fi Alliance frequency guidance sets out. A module that falls back to 2.4GHz in that environment competes with every access point on the deck, while the 5GHz band in the same structure is comparatively open. This is why dual-band 2.4GHz plus 5GHz support is treated as a functional requirement for European and Australian buyers rather than a headline feature.
Where the module and its antennas physically go
Behind the head unit is the correct position, and it is the same position on every platform. The centre trim comes off, two Torx T20 screws release the display bracket, the factory LVDS connector is moved across to the harness, and the module body sits in the cavity behind it. The antennas must not.
A production harness for a Volvo nine-inch head unit makes the routing explicit. It carries the CAN plugs, the LVDS leads, the microphone, a USB service port for firmware updates and two separate WiFi antennas, with printed notes on where the antennas must not be fixed. On this platform the antenna lead terminates at the far end of the harness near the windscreen, not under the screen itself.
Linux embedded compared with an aftermarket Android unit
The comparison below is technical and neutral. A third-party Android display is a valid product category with a different cost and risk profile; it is simply a different approach, and a buyer choosing between them should be clear about which trade applies.
| Point of comparison | Retrofit module (Linux embedded) | Third-party Android display |
|---|---|---|
| Original panel | Stays fitted; LVDS in and out carry the signal | Removed and replaced |
| Operating system | Linux in an embedded configuration, fixed image | App-based interface with background processes |
| Long-term behaviour | No app cache to accumulate; behaviour is predictable over years | Background processes accumulate state over years |
| Interface speed after years | Consistent, because the workload is fixed | Variable, because installed apps and services grow |
| Trim and fitment | Nothing trimmed or re-drilled | Per-model frame and trim fitment required |
| Original menu structure | Retained; the factory system is still reachable | Replaced by a third-party interface |
The practical difference for an installer is reversibility. A module installation can be removed in about twenty minutes and leaves the dashboard as it was found, which matters when a vehicle is on lease or when a fault has to be isolated. A display replacement cannot be reversed without the original part.
What the Sunplus chipset changes about the radio link
The chipset is an automotive-grade Sunplus part, and the relevance here is availability and behaviour rather than peak throughput. Car-grade silicon is qualified across a wide temperature range and is specified for a service life measured in years, so the module does not become an obsolete hardware revision halfway through a vehicle's ownership period. A module built on consumer-grade silicon has to be re-qualified when the part is discontinued, and that discontinuity lands on the distributor holding stock.
Smoothness also comes from the hardware doing the work rather than from the operating system being given more to work with. A Linux embedded image on a car-grade chipset runs a fixed set of processes: no app store, no background sync, no service index growing over time. Video decode, LVDS output and the WiFi radio are the only significant workloads, and they are scheduled deterministically. That is the opposite failure mode from the multi-year slowdown described in the comparison table above.
The 5GHz and 2.4GHz radios on these modules are driven from the same platform, so band selection happens without the display renegotiating. The screen shows the same CarPlay UI on either band, which is what makes the automatic fallback practical in a car park where the radio environment changes floor by floor.
Placement rules worth giving an installer
These are the rules that decide whether an installation is returned. Every one of them is an antenna and routing instruction rather than a setting:
- Antennas are never fixed with adhesive pads onto bare metal or onto a head unit bracket.
- Antenna pigtails are never folded back along the harness inside the dash cavity.
- The two antennas are kept separated and routed toward the front of the cabin.
- The module is not stacked flat against the rear of the display assembly.
- The service USB port stays accessible so a firmware update does not require trim removal.
- The reverse trigger wire is confirmed to switch the camera view before the trim is closed up.
Coverage extends across more than 300 vehicle models and series, and the fitment list names the head unit generation rather than the model year. For the platform pages, the product index lists every module against the head units it covers.
Frequently asked questions
Does the module work if the car already has wired CarPlay?
A retrofit module is for head units built without CarPlay. A car that already has wired CarPlay does not need one, and adding a module to it achieves nothing.
Why does the same module drop video in an underground car park but work outside?
The obstacle is physical: 5GHz is absorbed by concrete and metal, and a 2.4GHz band in a large structure is shared with every access point on the deck. Moving the antennas out of the head unit cavity and forward into the cabin fixes most cases. If a link still fails, the radio environment there is genuinely hostile and no band setting will recover it.
Can the antennas be shortened or replaced?
No. Antenna length is set by the radio design, and a shortened or substituted antenna changes the match across the band. Route the supplied pigtails instead of altering them.
Does the factory reversing camera still work with CarPlay running?
Yes. The reverse trigger line is carried on the harness, so the factory camera view takes over when reverse is selected, exactly as before the installation.
Do the original steering wheel controls still work?
Yes. The iDrive controller and the steering wheel buttons pass through unchanged; the module does not intercept them.
What happens to the radio across a long drive?
The dual-band radio moves between 5GHz and 2.4GHz as conditions change, and the display holds the same session throughout. Nothing has to be re-paired by the driver.
Terms for distributors
Stock MOQ is 10 pcs with mixed models allowed in one shipment. Private label starts at 500 pcs per model, and a full OEM firmware programme starts at 1000 pcs per model. Samples take 7 to 15 days by DHL or FedEx, and a volume order of 500 pcs or more takes 15 to 20 days. Quotations come back within 12 hours.
Payment is 30% deposit with the balance against a copy of the bill of lading, by T/T or PayPal. A sample fee is credited against the first large-volume order. For anything already covered here, the wholesale terms page lists the tiers in full.
If the antenna routing rules above are the part that matters for a particular platform, send the head unit generation and the model list through the inquiry form, and we will confirm fitment and antenna routing for those vehicles before a sample is produced. Quotation comes back within 12 hours.
Need the Module From This Guide?
Wholesale from 10 pcs (mixed models OK), samples in 7–15 days (DHL/FedEx express). Fitment confirmation within 12 hours.
Request Pricing Check FitmentRelated Resources
- CarPlay Collections — browse by marque family (German, British, Italian, Japanese, luxury)
- CarPlay Fitment Checker — find the module for your car
- CarPlay Decoder FAQ — 34 answers on compatibility, install and wholesale
- CarPlay Retrofit Buying Guide — platform identification & selection
- Wholesale, Private Label & OEM Program — MOQ, lead times, payment terms
- All installation & technical guides